- Home
- >
- Why Simons Rock
- >
- Contact Us
- >
- Offices And Departments
- >
- Information Technology Services: Wireless Network
Information Technology Services: Wireless Network
Step-by-step instructions for Windows Vista and Windows 7
1. The first step is to make sure that Windows is managing your wireless connections (and not handing this role over to a third-party utility, like Intel PROSet/Wireless, which is standard on most new Dells).If you usually manage your wireless connections using an icon (in your taskbar near the clock) that looks like this:

then you're probably all set for this issue and can proceed to step 2. However, if you manage your wireless connections with an icon like this:

then you probably use the Intel PROset/Wireless drivers and will need to fix this by right-clicking the icon and selecting Use Windows to manage Wi-Fi from the pop-up menu.
If you had to perform this step, then you should either reboot or go to Administrative Tools->Services in the Control Panel and scroll down to the Wireless Zero Configuration Service and start if it is not already running (if it's already running, you're all set).
2. Click on this icon in the taskbar:

and select the eduroam SSID from the list of networks. Click Connect.
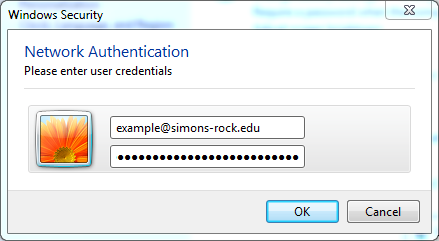
3. In the window that appears, enter your username@simons-rock.edu and password. Click OK.

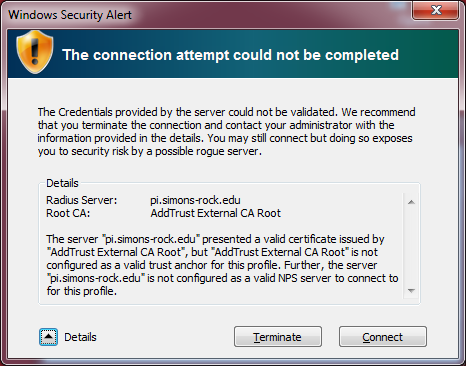
4. A Windows Security Alert window will appear. Click the arrow next to Details and verify that the certificate and server info are the same as shown here.

Click Connect.
Your computer is now configured for the Simon's Rock wireless network.
If you have any trouble with these instructions, please bring your machine to ITS during business hours or stop by and see the Computer Assistant (CA) on duty in the Alumni Library, Sunday-Thursday from 8PM-12AM. You may also call ITS at x7371 during normal business hours or email us at its@simons-rock.edu